Archives for category: interval reading

As I explained here, the basic idea of this book is to help young piano beginners (aged 4 to 6) to explore ‘sound’ through singing, listening, decoding, writing, etc.  I thought I’d share one example way of using this booklet in the lessons.

s_Creature Booklet

I took a minimalist approach for the layout of this booklet so that the learners can focus on the important information that requires their full attention.  And also this gives teachers and students some room to experiment/explore elements that make music ‘musical’, such as dynamics, articulation, tempo, phrasing, creative thinking, etc.


Page 2-3

The original idea on these two pages has been explored in a form of puzzle game, which I DIY’d.  Using two of 45cm x 45cm Velcro boards, I stuck the cutout images of these creatures, black-key houses and other features.  A teachers can ‘mess up the order’ so that a student can put them in the right order.  Multi-sensory approach such as this can help learning much more meaningful. To facilitate the memorisation of the order, I associate the images with a story, for example:

Two Black-Key House
1. Who sleeps in the kennel? A dog!

2. Elephant loves eating tree leaves, so let it sit by the tree.
3. Cats and dogs often hate each other but in this house, they’re best friends!  So, they sit  next to each other.

Three Black-Key House
1. Which ones are hopping creatures? Frog and grasshopper!

2. Frog loves swimming in the pond, so it sits by the pond.
3. Bee collects nectar for honey from the flowers, so he stays next to the flowers.
4. The smallest creatures sit inside the three black-key house.  Ant and grasshopper sits next to each other.

Creature Puzzle Board_small

As a follow-up reinforcement, I often use flashcards with images, so that the learners gradually get used to identifying a single (white) key name on the piano with the letter name. Here’re some examples:

Creature Puzzle Flashcard_small

Repeated reinforcement via visual and verbal involvement is quite important for young learners. This game exercises their brain efficiently and they usually memorise all the white key names in a couple of lessons and they can identify a single white key name on the piano without counting up from A to G!

This is one example of showing what’s provided in a couple of pages in the book (or any tutor book!) is often not enough and it usually requires supplemental work to get the most benefit.  Hence, teachers would need to use their imagination to help their young students internalise what they have just learned.
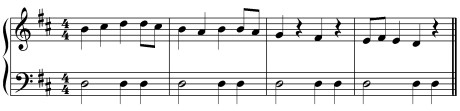

Page 8
Keyboard orientation & rhythm practice by singing rhythmic syllables. Although the fingering is suggested, it can be other finger such as 3. Notes can be played any part across the keyboard; have students decide which part of the keyboard they want to play on.  Encourage students to sing rhythmic syllables (green line: long, yellow line: short), not the creature names. Processing the images, Moving fingers, singing rhythms is a multi-tasking experience, which is a very much needed coordination skill for piano playing! Always draw students attention to a steady pulse as they sing and play.

Teacher can play the first bar followed by the student playing the second bar to see if they can keep a steady pulse throughout.  Or teacher can play a simple accompaniment to go with the meloly to help the student establish a steady pulse.  Be creative!

Creature Booklet page8_small

Page 14
Note writing. Regular practice of transcribing rhythmic notation is a good way of having the learners aware of a note value that is attached to each note.  Also it’s a good way of getting used to ‘seeing’ and ‘knowing’ the meaning of the notes before students start learning to read musical notation later on. As shown on this page, above each creature you see a note, of which value is set according to the rhythmic syllable line (long or short) written under each creature. From this page onwards, ask the student to write rhythmic notation above each creature as a regular writing practice.


Page 16
Dynamics
. When the learners are getting comfortable with singing and playing from the creature notation, it’s a good time to introduce another element of music, dynamics. Start with simple two contrasting loudness: forte (loud) and piano (soft or quiet). On this page shows the two identical melodic patterns. Ask to suggest a way to make an echo effect, etc.  It may be a good time to explain why we call this keyboard instrument ‘piano’!  For those who doesn’t know, try googling ‘Cristofori’s pianoforte’.

Creature Booklet page16_small


Page 21
Articulation & melodic shape recognition
. When the learners get used to singing and playing creature notation, it’s time to start introducing another element of music; articulation (slur and staccato), which can add a flavour to the sound. Slur can be explained as ‘walky’ and staccato as ‘jumpy’. Teach how to write slur and staccato sign over or under the notes.

Creature Booklet page21_smallSome pages can be played as one piece, a good example is page 20 & 21. Melodic shapes are very similar. Ask students to see if they can spot the difference and explain how different.  Using colour pencils to mark each shape as a reminder is another good idea:


Page 22
Composition/improvisation. When the learners feel comfortable learning pieces from this book, try encouraging them to create something or their own; perhaps in a ‘call & response’ style, or in a duet setting playing a counter-melody, etc. I’d like to share one example that occurred during the lesson with one of my 6 year-old students, although I didn’t’ intentionally set out to experiment with composing/improvisation!:


e.g1
O
ne of my 6 year old students wanted to write her own song using creature notation, so I gave her cut-out creatures so that she can paste them on a A4 paper to create her song. The only rule I gave her was ‘not to use all the creatures, just 2 or 3 to make a simple tune’. Here is what she came up with:

6yo's tune_small

And I played an accompaniment to her song like this:
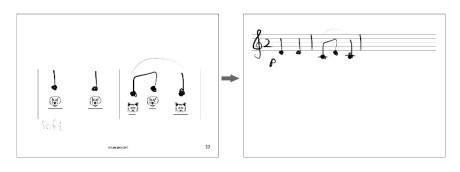
accompaniment example_6yo's tune

e.g.2
As we played together the melody shown below, my 6 year-old student couldn’t keep the pulse, so we practised tapping the pulse as we sang the melody, then asked her to tap the beat on a single note as I played the melody. As we continued doing so, she started to responding to my playing, and than playing a counter melody to it; B– B– | CBC– |. By then she established a steady pulse in her playing. This can idea can be extended to composition exercise within a frame set by the teacher.

Creature Booklet page22_small


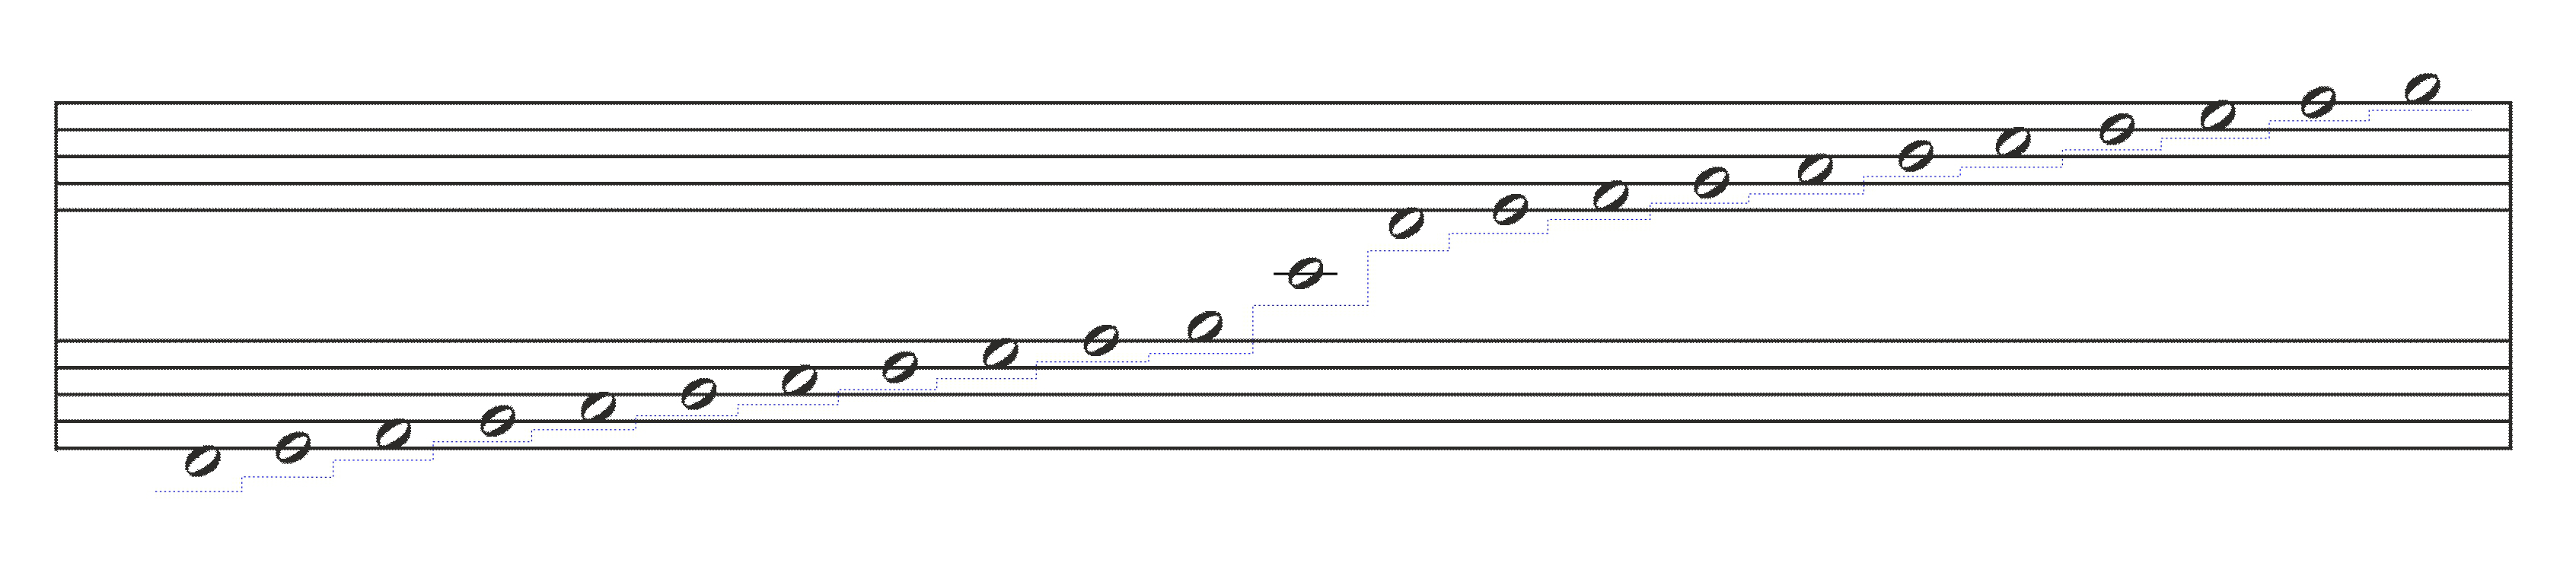
Introducing notes on the standard stave
With most of my students, I introduce note writing exercises as soon as they are exercised to recognise line/space notes and can understand basic rhythmic values (short & long) and . Notes are written on a single stave without a clef just to practise writing space notes and line notes, including ledge line notes so that they understand how the notes can move up and down on the stave. I wrote a blog post about it some time ago if you’re interested in reading.

By the time they get to half way through the Creature Booklet, they’re ready to start doing some transcribing exercises:

Creature Booklet transcription example_small

Having done a few exercises like this, my students could transcribe their own creature-notated songs into standard notation.

Have fun with creatures on the keys and always look out for what the student is captivated by on the moment and turn it into some creative activities. Be intuitive and spontaneous!


Alphabet Song Book_1

As I explained here, the basic idea of this book is to help piano beginners (aged 7 and above) to get started with learning how to read musical notation.  I thought I’d share how I’m using this book in the lessons.

The contents are simply laid out so that students can get on with work on a need-to-know basis.  And aslo it gives teachers scope to use the book intuitively as needed.  The intention of this book is to help the piano beginners grasp how learning to read musical notation works, by repetition, writing and creative activities. The book also leaves enough space for students and teachers to explore other details of piano study when ready, such as experimenting with dynamics, articulations, phrasing, tempi, technique, etc.  Teachers can add a simple accompaniment to help students establish a steady pulse and also cultivate a listening ear.  My students particularly enjoy the harmony when I play slighty jazzy chords to accompany –  often articulatio and phrasing changes when played in ensemble!

Page 4
The use of four-colour strip for the piano keys is inspired by the Colourstrings. I find it the most useful tool to make the ocean of black keys and white keys on the piano looks somehow manageable. Here’s a template to create a four-colour strip, which should fit on any standard key-sized piano. Make sure to open the file in Acrobat Reader and print it out as an ‘actual size’, not ‘fit to page’).  I use self-adhesive book cover vinyl (cut to 2cm square) to paste four strips together (much stronger than standard cellotape, I find).


Page 2 & 3
Keyboard orientation.
I’d usually introduce BAG only for young children. The reason being that the first half of the book is focused on learning the melodies based on BAG.


Page 5
An example of rhythmic patterns appeared throughout the book is introduced here in a 4-bar rhythm tune. Students can experiment with it by creating a tune using these rhythms, starting with one-note playing (any note or position across the keyboard!). Then, with two notes, then three, etc. Teacher and student can try a ‘call & response’ improvisation game; for example, the first 2 bars played by the teacher, followed by the  the student playing the next 2 bars.

Alphabet Song Book page5_small

The key thing to remember here is to sing the rhythmic syllables (e.g. shortshortlong) whilst playing the notes, with a steady pulse. Each heart shown on the page represents one pulse (beat).

Pulse in music is like our hearbeat; you can’t hear it but it’s always there ticking and you can feel it. Ask your student to tap each pulse as they sing the rhythms. This is the first ear-eye-hand coordination exercise!; tapping one thing and singing another at the same time.


Page 7 (the first BAG tune!)
Start with one-hand playing, right or left hand. Find the hand position using the keyboard guide.   Remember to sing the rhythmic syllables (NOT the letter names!), this exercises the skill to be able to follow two different information at the same time. Complete writing the rhythmic notation above each letter name. From the next page on, dotted guide line for the rhythmic notation disappears. It’s students’ job to remember to write in rhythmic notation above each letter name from page 8 onwards. It encourages students to be constantly aware of the note value attached to each note.

Students also could play the tune with both hands to develop the coordination.


Page 13
Practise writing
B note on a single F (bass) clef stave. Learn to write the same note in various note values here. Keyboard guide now has the Middle C position marked in. Have students try finding the B note below Middle C on page 12. Make sure which clef stave students should be looking at, top or bottom.

Alphabet Song Book page13_small

As a practice of being aware of rhythmic value for each note, trace over each rhythm line under each letter name with a colour explained on page 5.


Page 14
From this page onwards, students can write rhythmic notation with the stem pointing downwards if they wish to. Why is the note upside down? The answer is on page 11 where students practised writing notes on the great stave. Refer to it again and have them explain why!

Also from this page onwards, students have a chance to remind themselves of the new note they’ve just learned, by spotting it amongst other notes.

For one bar on this tune, the letter names disappears and are replace by the B notes written on the F (bass) clef stave. Ask students what notes they are; they would know what to play there. Make sure students are still singing rhythmic syllables whilst playing the notes. Finally, ask students how many B note they can find in this tune.

Also I’d experiment with dynamics at this point when students are getting used to playing some tunes. Loud (forte) and soft (piano). Let students decide which bars (measures) they wish to play loud and soft and add dynamics markings accordingly.


Page16
Pattern recognition
. Can students find repeated melodic patterns in this tune? Once they recognise them, they can be aware of playing the same thing twice. Economical reading skill!

A new note, A, to practise writing on the F (bass) clef stave. I’d have students compare it with the B note and explain the difference (line note, space note, where on the stave, etc.)

Alphabet Song Book page16_small


Page 17
Time to experiment with articulation here. Legato playing. What’s legato playing? Basically, imagine your fingers are your legs doing a walking action on the keyboard; one finger presses the key, and then the next finger presses but the link between the two fingers slightly overlaps before the first finger releases the key, so that the two notes sound connected rather than disjointed. The arch marking to indicate legato playing is called slur. Write a slur marking over the first three notes to be played legato. Ask students to write some more slurs in!

Alphabet Song Book page17_small


Page 19
All the letter names now disappear! But students know which note is B, A, G note by now. Although it’s important recognise each note in letter name, it’s equally important to be able to see a group of notes as a pattern. B-A-G looks like a smooth downward slope. B-G-A is more ragged. It’s a useful exercise to drawn students’ attention to the patterns in each tune. I’d also challenge them to find BAG in the tune; circle the B-A-G pattern and sqaure the backwards BAG, G-A-B pattern), not only within a bar (measure) but also across the barline!


Page 22
Composition
page! The first 8-bar tune is to consist of two 4-bar tunes that students have learned in the previous pages. Choose 2 pages to copy or transcribe. If students choose from page 7 to 13, the notes are all in letter names, so they have to trascribe the letter names into notation, which is an exercise itself to test their knowledge on these three notes, BAG. The second 8-bar tune is to be composed by students.  This is a creative test to see how imaginative students can be to come up with yet another tune consisting of 3 notes only. Be prepare to be surprised!


Page 23
Appearance of the D note on the G (treble) clef stave. From this page on, the tunes will be laid out on the double staves (great stave). Usually, the top stave is for the right hand, the bottom stave is for the left hand. Warning here!: G (treble) clef doesn’t mean ‘right hand’ and F (bass) clef doesn’t mean ‘left hand’! G (treble) clef simply refers to the area above the Middle C. In some music, the left hand does play the notes above the Middle C on the keyboard. In that case, you’ll see G (treble) clef on the bottom stave as well as on the top stave.

Up to the previous page, students could play the tune with both hands in unison but from this page on, the both hands’ positions are set specifically as indicated.

It’s another good point to experiment further with dynamics; Soft (piano), medium soft (mezzo piano), medium loud (mezzo forte), loud (forte), gradually getting louder (crescendo) and getting gradually softer (diminuendo). Perhaps in the faster speed when ready.

It’s also a good time to introduce the real names of note values for short, long, twice as long, etc.  In my piano studio, I use American name rather than British, simply because it makes more sense and it helps students understand the concept of time signature when they get to it.

The second half of the book covers more BAG tunes with two added notes, E & D (ED). Go over (again) page 3 to get familiar with all FEDs across the keyboard. Work through the pages to the end likewise as suggested for the first half of the book.

Alphabet Song Book 2 (for piano) will explore triple time (3/8 time rather than 3/4 time), and more words, FED, EGG, Cs and A-B-C in addition to BAG, and delve into the concept of basic time signatures. 2/4 and 3/8. It’ll be available soon.

Happy reading!

—Update—
I’ve been using this book with my piano beginners for some time now; some started with no interests in reading musical notation; some had some knowledge of musical notation but haven’t quite got the hang of it; some can play pop songs by rote but never tried reading musical notation, some had just started the piano but keen to learn how to read music, etc.

When they get to about page 29, I started giving them a couple of longer pieces as a challenge from various beginner’s piano books, such as Jibbidy-F and A-C-E by Hoover Ward, Music Lessons Have Begun by Fletcher, various primer level pieces from Faber & Faber’s Piano Adventures series, Hal Leonard’s Broadway and Movie Hits Level 1 (piano duet), etc.  My students’ reaction to this challenge has been quite a positive one and when they realise they can read music to play a proper tune, it certainly boosts their confidence and motivation to carry on with the rest of Alphabet Song Book 1 and beyond!

My students’ favourite part of the book is composition pages .  By the time they reach composition pages, they usually have some knowledge on flats and sharps which are covered in pieces such as Pink Panther, which I usually teach them by rote.  Although the suggested notes and rhythms for the composition work are from the book, they often tend to experiment using the knowledge they have learned outside the book as well.

This is the part I do enjoy too as a teacher; getting a glimpse of my students’ creative world that I haven’t seen before.  Some use similar patterns from the book but in a different order or their repetition; some create mysterious sounding music using suggested notes but with sharps and flats;  some show a skill of creating symmetrical patterns; some show natural sense of 2-bar phrases; some adds other musical details such as dynamics and articulations themselves without me reminding them; some play around and explore before writing anything in, etc.

So far, my students are finishing the book 1 at the pace of 6-7 months along with other assignments they’re working on.  They’ve learned how to read and write a simple music, along with the importance of dynamics and articulations.  They’ve acquired a skill to recognise melodic/rhythmic patterns and their repetitions in music.

I look forward to reporting on Alphabet Book 2 soon!

—Update2—
Alphabet Song Book 3 is now available from my website shop!

For the past months, I’ve been experimenting with a new way of improving sight-reading for my students preparing for the ABRSM piano exam (Grade 1 to 5 levels in particular). Some have an innate ability to sight-read without so much difficulties (except in tricky keys and rhythms) and some have a tendency of freezing up as soon as there comes a point where they have to play the two lines simultaneously. To overcome common problems associated with sight-reading, I’ve decided to give it a completely new approach where it doesn’t involve note reading but it involves understanding of keys, metres, rhythmic patterns & melodic composition and harmony. I call it an “improvisation” approach. This approach seems to stimulate the parts of the brain, which tends to be less exercised in other approaches I’ve tried and improve the overall eye-ear-hand coordination required to become better at sight-reading.

Here’s my new improvisation approach I’ve been testing with my students using Paul Harris’ Improving Your Sight-Reading (for piano) series:

  1. Pick a rhythmic exercise to use as a base for improvisation

[Excerpt from Improve Your Sight-Reading Grade 2, Stage 4 Rhythmic Exercises]

Rhythmic Exercise from Paul Harris' book

  1. Let the student decide which key they wish to practise in; some will choose the easiest key; some will choose the one that they feel they need to practise the most. Have the student play one octave scale in the chosen key to check all the scale notes (hands separately). Now, set the right hand position for 5-finger pattern (scale note: 1 to 5).


  1. Now, look at the chosen rhythmic exercise, and create a random melody following the given rhythms. The right hand plays the top rhythm using 5 notes whilst the left hand plays the tonic note of the chosen key on every beat. It’s likely that those who are new to improvisation exercise tend to play lots of repeated notes and change the note here and there or play too many wide intervals, which usually result in an unmusical tune.


Ways to experiment in your improvisation exercise:
Make sure your eyes are always following the rhythms on the staves throughout the exercises!

Idea-1. Try playing a scale up and down following the given rhythms without repeating any note consecutively. The last note should be the tonic note (for now). If the tonic note seems to come earlier than you’d like, make a detour (going around the tonic note) so that the exercise ends on the tonic note. Likewise, if there’re one or two too many notes before reaching the tonic note, skip a note or two so that you can end the exercise on the tonic note:

e.g.

impro_ex1

Idea-2. Recognise any repeated or similar pattern in the rhythms. For those patterns, you could play the same notes in the same order:

e.g.

impro_ex2

Idea-3. Use a mixture of steps and skips but no wide intervals (for now). Many tunes that you can easily sing/hum often consist of stepwise motion (consecutive intervals of 2nd) with occasional skip(s) (interval of 3rd):

e.g.

impro_ex3

Idea-4. Experiment with the direction of the melody line to create contrasting ideas. For example, one pattern going down-up-up-down and then the second pattern going up-down-down-up.:

e.g.

impro_ex4

Idea-5. Be inventive using an economical compositional technique, sequence. For example, in the first bar, play the first four notes in an ascending form, then one step down. Then repeat this idea for the second bar but starting on one note higher. You could add the 7th note of the scale (note one below the tonic note) for creating an effective ending. You could also change the note value of the LH pattern; holding each note twice as longer ( LH pattern1 ); or combination of the two note values (e.g.  LH pattern2  ). Each change introduced will help increase your ear-eye-hand coordination:

e.g.

impro_ex5

Idea-6. When you become comfortable with improvising within the 5-finger position, it’s time to extend your horizon a little bit. Try using one octave scale notes and introduce some repeated notes. For example, for the first two bars, use the top part of the scale (scale note: 4 to 8), and then for the following 2 bars, use the bottom part of the scale (scale note 1 to 5). Always remember to use the fingerings that you’ve learned from your scale practice. (e.g. know when to bring the third finger over the thumb, so that you won’t run out of the fingers to complete the phrase):

e.g.

impro_ex6

Idea-7. Change the LH pattern to Tonic-Dominant note played alternately on every beat. This increases the attention you’d need to pay for both hands. Keep reminding yourself of the order of the notes in the LH whilst improvising with your right hand:

e.g.

impro_ex7

Other LH patterns to experiment:

  • Alberti bass following I-V7 chord sequence
  • Tonic & Dominant 7th chords in a blocked form
  • I-IV-V7-I chord sequence in a form of blocked chord or broken chord

e.g.

impro_ex9

N.B. In 3/4 time, you could try Tonic-Dominant-Dominant pattern. Another notch up to increase your eye-ear-hand coordination here!


Idea-8.
When all the experiments seems to come naturally under your fingers, it’s time to swap the task between the hands! Now, RH plays the beat notes whilst LH plays improvisation.

e.g.

impro_ex8

For whatever you do in your improvisation, always aim to create a musical phrase; a phrase you’d be able to sing naturally so that the music doesn’t sound like a collection of notes being played randomly without a sense of direction, and if you can add dynamics to shape the melody line. Also, you could try different tempi if you feel ready.

When you get used to improvise in your chosen key, it’s time to delve into as many sight-reading exercises written in the same key as possible.


What to look for in the score before you start sight-reading:

[Excerpt from Improve Your Sight-Reading Grade 2, p.15]

 e.g.

Sight-reading excerpt_grade2_p15-1

  1. Check the key signature and time signature and decide how fast your beat speed is going to be according to the tempo description (e.g. Andante) or character description (e.g. lively) if there is one.


  1. Pattern analysis: rhythms, melodic shapes, repetition (sequence, etc.), any tricky rhythms that you’re not sure about? (–> find out how these rhythm fits within the beats).

e.g.
Melodic shapes

LH: Starting on the tonic note, play a 4 note-scale down to A (the lowest note in this exercise); two half notes (minims) per bar and then going back up to the E (the highest note in this exercise) by going through a sequence of 3-note scale, and then ends with the tonic note.

RH: Starting on the tonic note, a short motif ( 3-note motif ) is played and its repeated in the next bar, with slight different filling notes (first motif is followed by A-E, second by E only). It ends with the tonic-dominant-tonic pattern.

As you analise the patterns, try singing the notes as you quietly play them along. Make sure you take into account other details such as dynamics and articulation at this stage. If there are fingerings written in, try to follow them as well.

  1. Identify which hand part seems to have less notes and less movements? Loosely memorise such patterns so that you can focus on the other hand part that has got more notes and movement.


Do you remember how you managed to focus on getting the two lines going simultaneously when you did the improvisation exercise? Keep the easier part (LH) in the back of your mind as you focus on the more trickier part (RH).


  1. Before playing the exercise with both hands, see if you can sing the RH melody as you quietly play the LH melody. This helps you see/hear the two lines horizontally as well as vertically. Always be aware of the point where both hands come together. If there’s a gap in the music, clearly visualise where the beginning of each beat is, so you won’t loose counting.


  1. When the preparation is finally done, play the exercise once without stopping, no matter what happens. If you have to improvise a few notes around the mistake, go for it! It’s better than going back to fix it and loose the flow of the music. Sight-reading is about following the music without loosing the beat, playing as many correct notes as possible and playing them as musically as possible.


You may think there’re an awful lot of things to do/think about before playing a short exercise just once but the most important part is preparation. Just like anything else, be it DIY, sewing, planting, plumbing; getting the preparation work done properly makes the actual job go much smoother than going straight into it without any preparation.

Happy sight-reading!

There’re tunes that I use with my beginner students of any age at the early stage of their piano learning; young children, older children and adults even!  Ideals tunes that serves the purpose of keyboard orientation as well as introducing fundamental elements of how music works; sound, pulse, silent pulse, melodic shape, character, articulation, dynamics, theory, etc.

1.Whole-tone scale based tunes:
To the Moon_small

On the Moon_small

Back to the Earth_small

By the end of exploring the keyboard playing these tunes, students are usually well aware of what makes spacey sound (whole-tone scale); 3 black-key followed by 3 white-key (around 2 black-key) or 2 black-key followed by 4 white-key (around 3 black-key).  They also learn to listen attentively!


2.Chromatic scale based tune: Pink Panther by Henry Mancini

Preparation
Thumb on the white key and middle finger on the black key.

chromatic scale playing_small

tip for chromatic scale playing_small

Pink Panther _ bass patterns:
Pink Panther-bass patterns_small

This exercise teaches the students about counting, listening, articulation, dynamics, optimum hand shape, relaxed wrist, how to use thumb for piano playing, etc.

Next scales to explore will be diatonic ones, which is basically a mixture of above two scales!

I hope you enjoy a little time with your students to explore what piano can do before reading study begins.

Happy exploring!


I’m sure it’s a natural development for many enthusiastic and creative teachers to write pieces for their students.  The reason to do so may be for pure enjoyment on both parts or born out of necessity. There’re as many types of students as there’re teachers.  Every teacher is different and has his/her own approach and so is what each student wants out of the lessons. As one of the teachers who are trying their best to respond to such needs, I’ve also been writing many little pieces for my students for the past years, often tailored to the level of their playing skill and most importantly in a style of music that they can relate to. For me, the challenge is to help those who started the piano for the first time without any musical background (no music learning in their schools, etc.) and their age is about 9 years old and above. Unlike small children, those age group children have been regularly exposed to the music surrounding them and the reason why they want to take up piano lessons often is because they want to play like someone or want to play some songs they enjoy listening. That means that they have a rough idea what they wish to get out of their lessons. Having had gone through some tricky situations where I couldn’t seem to find enough materials for those particular age group beginners, I’ve started to write pieces for them, inspired by what they enjoy listening and wants to play. It took me some years before I managed to put them into sensibly categorised collections.

I’m pleased to announce that one of such collections is finally finished and professionally printed for publication.  This book is the second in the series aimed at the late elementary to early intermediate levels.  It came out earlier than the book one simply I frequently use the pieces from the book two with my teenage students at the moment.  Having said that, one of my ambitious little players who have just passed ABRSM grade 1 also started using it.  Hopefully, book one and three to follow soon, and then book four.

My students are happy now to have those pieces in a book form, not on the A4 printed sheets on their ring binders!

Please have a visit to my website if you’re interested in having a look. It’s available for purchase.  I’m gradually put all my other pieces into several collections (some etudes for piano beginners, some fun rhythm pieces based on morse code, some folk songs for children, etc.), which I hope to add to my website shop under sheet music in the near future.

Happy playing!

—update—
Piano Songs for Young Adults ~album one~ is now available from my website shop!


In recent years, I’ve welcomed a few teenage students who have never played the piano before or who had a few years of lessons but had given up when they started playing with both hands.  Teenagers making their own decision to start piano lessons while leading a busy school life working towards GCSEs, deserves a pat on their back.  They’re often looking for something to enjoy, enriching their life outside the school. Consequently, I feel all the more responsible to make sure that they achieve what they’re hoping to get out of piano lessons.  Learning to read musical notation is not necessarily their first priority, although they may have had some experience of reading musical notation during the music classes they received in the past.  And indeed, a little reading skill is useful.  As you can guess, their choice of music usually revolves around the pop songs they listen to.  It’s certainly a challenge for piano teachers who are not into pop music or who, like myself, went through the phase of listening to pop songs a long time ago, like myself.  Finding out what’s current and popular amongst teenagers is not difficult because students will usually short-list them for you.  The true challenge lies in how teachers can make learning pop songs as musically educational as possible as one does with more classically orientated repertoires.  What I usually do first is to ask my students to write down a list of songs that they enjoy listening to so that I can listen to them via he internet.  I then decide whether any are suitable for piano, either in a piano solo style or self-accompanying style.  Here are some criteria that I consider when choosing pop songs for piano lessons:

Ideal songs for piano solo arrangement contain (a little reading skill may be useful):

  • Melodic interest (enough shapes in the melodic line; not too many repeated notes – what sounds good as a vocal doesn’t necessarily mean that it works for a piano solo arrangement)
  • Rhythmic interest (syncopated rhythm either in the melody line or in the bass but not both)
  • Harmonic interest (at least 4 chords)
  • Tonal interest (ideally a simple modulation)

Ideal songs for self-accompanying style arrangement contain:

  • Simple chordal patterns repeated in the background (blocked and/or broken forms without syncopated rhythms), usually best played by the right hand
  • Simple bass patterns, which carry potential for exploring syncopated rhythms to mimic the drum beats, usually best played by the left hand
  • Words in the lyric that have ample syncopated rhythm

Those who aren’t keen on reading musical notation are often willing to learn about patterns based on chord structure. For that reason, it’s usually easier for the first timer to learn songs in a self-accompanying style. Giving a single letter as a root note of a chord and other chord notes by intervals is often enough; the concept of inversions can be explained at a suitable point.

Chords can be written out in letters or keyboard patterns drawn showing which keys to press for certain chords or explained in chord symbols as a shorthand reminder (the bass note in the left hand is almost always the root note of the chord in pop songs).  Anything that helps the students internalise the shape of each chord! Some chords may need simplification depending on the student’s capabilities.  For example, 2-note chord instead of 3; 1st inversion instead of 2nd, blocked form instead of broken or vice versa, as long as they sound harmonically balanced.

Another issue may be choice of key; C major is not necessarily the easiest. To visually recognise chord patterns, it often seems easier for students to have a black key or two in the chord.  Also, when the 2nd or 3rd finger can stay on the black key, chord-playing seems a little easier due to the natural shape of the hand (as Chopin would advocate).  This means that transposition may also be necessary depending on the choice of pop song.  It may seem more work on the teacher’s part, but as students need a regular dose of challenges to keep motivation going, so do teachers!

By the time they have learned to play an entire song, they will have a very good grasp of chord playing in the right hand because of the repetitive nature of pop songs.  They get to practise the same chord patterns over and over especially if they sing all the verses and choruses.  Playing a long song also helps them learn about the structure of music, even if simple as verse / pre-chorus / chorus / bridge / chorus.  As pieces with chords in the right hand start appearing at the grade 3 level in piano exams, learning to play chord-based pop songs can be usefully integrated into the lessons for those who are preparing for an exam to explore more possibilities.  You never know, it may lead to more creative activities as they explore.

The fun part of learning self-accompanying style is that students get to sing along to their own playing.  Having said that, some students, especially boys are often reluctant to sing during the lessons.  I gently encourage them by asking if they’d try at least to speak the words so that they learn how the words fit to the piano part.  If they still refuse, that’s OK too.  The teacher can sing for them and let them listen carefully to how the words fit whilst they try keeping a steady pulse in their playing.  Students have a tendency of missing out a beat or adding an extra beat when the words fit between beats.

Here, I’d like to make a list of elements in pop songs that can be considered educationally beneficial:

  • repetitive nature (useful for developing various muscles, small and large)
  • simple structure (good for form analysis, pattern analysis; it may lead to creative activities)
  • self-accompanying a song opens their ears to listen to themselves naturally and also lays a good foundation for ensemble playing
  • syncopated nature of pop songs in a solo style can further develop coordination between the hands in particular (some students prefer playing the melody than singing it)
  • looking at the hands while playing helps the students observe how their arms/hands/fingers are manipulated, hence they’ll be more aware of how to control various movements of parts of the body, such as the arm, wrist rotation (circular, axial, lateral, etc.), hand/finger shapes, etc.

So far, I have mostly focused on teaching pop songs by rote.  Those who can read music (say grade 1 standard or better) can usually get around skimming through the notations in the music to be able to use them as a visual guide.  This skill is somewhat necessary when the player wishes to play a solo arrangement of a pop song, especially when they put both hands together.  It is often true that seeing how the each part comes together between the hands in a notated form makes it easier to ‘get it’.

My top choices amongst those that my students happily and successfully learned so far are as follows:

For those whose reading skill is not there yet:

  • Imagine by John Lennon (self-acc) – C major (mainly primary chords with a few borrowed/ altered chords which give a lift to the song)
  • Someone Like You by Adele (self-acc) – A major (ideal for wrist rotation; middle fingers can stay mostly on the black keys as the chord shape changes
  • The Power of Love by Frankie Goes to Hollywood [Gabrielle Aplin cover]) (self-acc) – B minor (4 chords throughout but the order of them changes in some parts of the song; broken chords shared between the hands)
  • Mad World by Tears for Tears [Gary Jules cover] (piano solo) – E minor (4 chords throughout; melodies explored in simple scale and chord patterns)
  • Only Love Can Hurt Like This by Paloma Faith (self-acc) – C major (3 chords throughout; ample syncopated rhythms in the lyrics supported by simple blocked chord on every beat)
  • Like I’m Gonna Loose You by Meghan Trainor (self-acc) – C major (4-chord strcutre with triplet feel throughout; ideal for developing ear, hand and voice coordination) –> available from SheetMusicPlus.com.

For those with some reading skill:

  • Jar of Hearts by Christina Perri (self-acc) – E flat major (starts in C minor, then modulates to E flat major; contrapuntal passage in the Bridge section)
  • Your Song by Elton John (Ellie Goulding cover) (self-acc) – B flat major (the right hand chords may be simplified sensibly; ample syncopated rhythm in the lyrics)
  • Century by Fall Out Boys – E minor (some intricate drum beats in the left hand can be explored with a simple right hand melody (piano solo)
  • Sail by AWOLNATION – pentatonic melody! (piano solo) – G flat major (pentatonic-based melody, which means most notes are the black keys)
  • Let It Go by Anderson-Lopez & R. Lopez (self-acc) – G major (simpler than the original A flat major, especially when it modulates to the subdominant key in the middle section and it’s still singable, not too high or too low) –> available from SheetMusicPlus.com.

To help those who are not reading notation just yet or are reluctant to read, a teacher can introduce a few notes that appear frequently in the music as guide notes, and find the notes around them.  A good old mnemonic device could be used here.  I’m sure many teachers have their own versions.  Here’re some of mine that prove to be successful with my beginner students:

Middle C (middle of the great stave is where Middle C is)

ACE chord (on the while keys, skip a note to the left from the Middle C is A & skip a note to the right, E)

G [=treble] clef G (the eye of the swirl of the treble clef is where the G above Middle C is)

F [= bass] clef F (between the two dots of the bass clef is where the F below Middle C is)

Birth Day (mnemonics for the notes located on the middle line of the stave; B [= b’] in the upper stave & D [= d] in the bottom stave)

Ground (the lowest line note in the standard piano score = G)

Fly away (the highest line note in standard piano score = f’’)

It may seem obvious but guide notes should always be introduced in association with their positions on the keyboard.  Reading other notes can be encouraged by learning to recognise intervals (step = 2nd, skip = 3rd) and the direction of the notes (up = to the right on the keyboard or down = to the left).  This method can help the learners concentrate on reading intervals rather than individual notes.

Young adults are capable of picking up useful information and internalising it in their own way.  A few pointers are usually enough for them to get going as long as the music really interests them.  When students develop some playing skill and memorise a few guide notes, simple tunes, both well known and unfamiliar, can be gradually introduced.

Pop songs, particularly in a self-accompanying style, can also be successfully used with those who have been playing the piano for a few years.  Young players around 11-13 years of age seem to show the change of interest in music as they go through emotional changes, especially girls.  Pop songs seem to be able to reach young people in a way that the classical music repertoire can’t, but that doesn’t mean they can’t be encouraged to play classical music.  They can always apply a few new skills that they have acquired from playing/singing pop songs, during which they had no pressure mastering tricky passages to be able to play for concerts, competitions, exams, etc.  Nothing in musical endeavours, however trivial it seems, goes to waste, as long as teachers can find the educational contents in it to elaborate.

Recently, one of my 10 years old students played for me an accompaniment of a certain pop song that all year 9 classes sang together at the school assembly.  He picked up a few chords, so I made a simpler arrangement to teach about the chord patterns, and so that he can easily memorise the whole song.  Here’s what comes out:pop-song_self-acc

This pop song seemed very popular amongst young children for a while.  I’d be curious see if teachers can play this accompaniment to their students and have them guess which pop song it is.  I have managed to teach this simple chord progression to my youngest students (5 years olds) successfully.  It’s turning out to be a very effective tool to teach how to play the notes lightly and bouncily, i.e. how to release the tension after playing each note or chord.  It’s also a good counting exercise; up tempo with lots of words to sing along!  For young children, it’d be best if the teacher sings the lyrics so that the student can focus on the timing of when to change a chord to another.

Pop songs won’t teach students about the agogique required for playing Chopin but it helps them cultivate a steady inner pulse; listening ear; coordination between the hands; healthy use of upper body, arms and wrists; basic finger and tonal control; articulation technique; understanding of keyboard orientation; basic understanding of harmonic and musical structure, etc., and most importantly, it gives them a personal enjoyment that is theirs and no one else’s.

For those who are looking for pop song arrangements of intermediate level, here are some of mine recently published from SheetMusicPlus.com:

Happy playing!


I assume many music teachers have their own favourite mnemonic device or landmark notes system to help the students to memorise the notes’ positions on the stave (staff). For piano players, it’s important to be able to read the notes up and down across the great stave (staff) seamlessly. Some years ago, I came up with my own landmark notes idea to introduce a couple of chosen line notes across the great stave (staff), so the learners can use these notes to find other notes around it on the piano by reading intervallically without necessarily knowing the letter name for all the notes on the staves. That means they can focus on learning to play melodic or harmonic patterns rather reading and seeing each individual note.

Here’re the landmark notes I’ve chosen and added the mnemonics to them:

landmark-notes

The order of introducing these notes that I often go for is:

  1. Middle C, G clef G and F clef F
  2. BirthDay notes (middle line note in the treble=B and middle line note in the bass=D)
  3. Ground G (as in the ground floor) and Fly away F (to emphasise the highest line in the great stave; you can fly away from the top line!)

Additional landmark note: Dangling D in the treble stave (this characteristic feature seems to stick in children’s mind well, so it’s a popular one to use)

Once the learners have gone through enough drills (or any helpful games!) to exercise reading these individual notes, they can exercise writing melodic patterns on a manuscript paper. For example, choose one landmark note, such as G clef G, then go step up twice (from line note to space note and then to line note again), throw in a couple of skips here and there (from line note to line note or from space note to space note), etc.

Having said that, depending the age, some learners need repetitive writing practice just going up stepwise and skipwise so that they can see clearly what stepwise/skipwise motion is on the stave.  Young aged children tend to take time in this.

When the learners get comfortable with various melodic shapes, here’re some extended ideas I often use; Word search.

  • BAG and FED are the first ones to introduce because they cover every single note on the piano except C (C on the piano seems to be everyone’s favourite, so is easy to spot!).  And also because it’s a stepwise motion, finding them on the piano is also simple and can be used as a reminder for the key names on the piano (I’m not in favour of using ABCDEFG to memorise the key names. You can guess why!)

The first position for BAG I’d use is starting on BirthDay B and then going descending stepwise.

For the first position for FED, I’d go for either starting on F clef F or ending on Dangling D. The decision is usually made depending on which landmark note is more in the learner’s memory and how well s/he understands how the melodic patterns work.

  • Then, usually progress to some other words, like EGG, DAD, BED, FACE, BAD, ACE (ACE is a useful one to introduce as a landmark chord because it covers skipwise intervals from the Middle C), etc.

Exercise form can be either reading the notes then playing them on the piano or playing first, then write the notes down or placing the notes on a notation board if teachers have one (very useful tool to have – I have a magnetic one of my own design).  For some words, finding the notes on the piano can be a little tricky, so I often leave that part of exercise out.  But generally children enjoy ‘spelling out’ the written notes to find the word.  They seem to  find it a good enough impetus not to dislike this game although it sometimes takes them time to find the word!

Although these type of exercises are useful and should be important part of the lessons, they’re more meaningful when they’re linked to what students are learning or going to learn. I often have them find a chosen landmark note(s) or a word (such as EGG, etc.) hidden in the music that they’re learning or are going to learn rather than starting from the first note in the music. Some of my students are very good at finding FED in the music because in their mind, it has got a characteristic shape. This sort of pattern search game always leads to finding repetitive patterns in the music; a very useful exercise to learn about a musical form eventually.

What I have shared in this post is just one part of various ideas that pop up as we work through reading exercises in the lessons. I hope you take something from the ideas here and expand them and turn them into your own.

Stay creative!

—update—
Note Reading Drills for piano, using this landmark-note idea is now available from my website shop.  I’ve been using this little booklet with my students who have been learning the piano for a couple of years but reading music notation isn’t their forte but would like to improve it.  Also suited for adult students who have some knowledge on reading music notation but not using their knowledge practically.  For more details, please read my blog post.


I’ve been asked by one of my 8 years old pupils’ mother yesterday; ‘I wonder when my son starts learning to read music. He seems to be frustrated because he can’t read yet. He’s so keen and wants to do more.’ He only started piano lesson 2 months ago and he’s learned a few pieces and etudes, and during the holiday he enjoyed playing a Christmas song with a harmony in the left hand. Off to a good start, without needing to read notes to learn pieces, so he can focus on getting his ear-eye-hand coordination sorted and ready to tackle an intricate task of decoding notation later on.

Coordination doesn’t just mean moving fingers and putting the hands together. It also includes the ability to ‘hear’ what you’re playing or what you’re going to play and how you’re going to play, to ‘understand’ high and low in sound in relation to up and down of the keyboard, to be able to ‘sing or hum’ the melody line while you’re playing to maintain steady pulse, to learn to sing or hum rhythmic patterns while you’re playing so that you’re aware of rhythmic values in music, to ‘transfer’ the information that your eye took in to your finger work, etc. When pupils have gained such coordination first, they usually find their way not to get frustrated when they start learning to read notation. So, to my view, a couple pages to cover how to read notation as you find in most conventional piano tutor books seems not sufficient enough. A lot more careful and considerate preparations leading to reading notation seems necessary and more sensible. With anything else, ‘internalising’ takes time and effort.

To compare how we learn to speak and read your language, it may sound much clearer. Did you start to read a book before you speak your language? Did you start learning to read before you can write a few words? When you read, do you read letter by letter to form a word? And finally, can you read this?

I cnduo’t bvleiee taht I culod aulaclty uesdtannrd waht I was rdnaieg. Unisg the icndeblire pweor of the hmuan mnid, aocdcrnig to rseecrah at Cmabrigde Uinervtisy, it dseno’t mttaer in waht oderr the lterets in a wrod are, the olny irpoamtnt tihng is taht the frsit and lsat ltteer be in the rhgit pclae. The rset can be a taotl mses and you can sitll raed it whoutit a pboerlm. Tihs is bucseae the huamn mnid deos not raed ervey ltteer by istlef, but the wrod as a wlohe.

In reading music, the same can be said, I believe. If your mind is trained to recognise patterns in relation to how they sound, guessing work can kick in and you can focus on executing the sound on your instrument. For this reason, I usually introduce to my pupils an interval reading technique, rhythmic reading/writing exercises and a few landmark notes writing exercises in the early stage of learning, while they learn to acquire coordination skill to be able to ‘hear’, ‘sing’ and ‘play’, so when it comes to reading music to learn pieces, they know what to do. They take in rhythmic values properly, they can maintain steady pulse while they play, they can play in an ensemble setting, etc, and they can eventually become independent learners.

Back to this 8 years old pupil of mine, he’s already done quite a bit of preparations to start reading notation very soon. He just doesn’t realise that they’re part the course and that he’s already acquired some reading skill to read music! He’ll soon no doubt find out he can actually read music 😉

As I briefly mentioned in PART II, I’d like to explore more about pattern recognition (visual) in relation to executing them on an instrument (kinaesthetic). Though, another invaluable skill not to be forgotten is to be able to ‘hear’ in your mind what you see (aural). To explain what I mean, I’d like to give you a simple example here before I move onto focusing on visual and kinaesthetic combination exercise, hopefully in my next post!

Here’s a very simple tune that everyone knows. Some may have recognised it instantly just by letting your eye run through these 4 bars quickly. Those who don’t read music, here’s what you can try.

a tune everyone knows

1. Learn to sing the rhythm with steady pulse you can detect from singing these patterns; you’ll find that it usually occurs naturally! (See my past post dated on January 26, 2012 at 4. Understanding rhythm, about the rhythmic syllable you can use to sing)

-Bar 1: short-short-long_______
-Bar 2: short-short-long_______
-Bar 3: short-short-short-short
-Bar 4: twice as long_________

2. Recognise the direction of the notes (See Part II, about how to recognise intervals)

-Is it staying the same?
-Is it going up a step or skip?
-Is it going down a skip or double skip?
-Is it going stepwise, up or down?

3. Now try adding various pitches following the direction of the notes (It may be helpful to use your hand showing going up or down to guide your voice visually).

-When it goes up a skip, raise your voice pitch a bit higher.
-When you see a big drop (a double skip here!), lower your voice pitch down slightly more than a bit.
-When you see a stepwise motion, simply try singing the scale up or down.

4. Try singing that way a couple of times with correct rhythms (An important bit! – correct notes with wrong rhythms would make a well-known tune virtually unrecognisable!) to see if you ‘hear’ a recognizable tune.

5. If you still have no luck by now, change your rhythmic syllable singing to just humming but with correct rhythm. Or even without looking at the music if you managed to memorise the melodic shapes by now (It often helps you focus better on listening when you take visual distraction away!).

Now, can you guess what the tune is? Also, an important thing to remember here is to let your ear have an ‘attentive’ listening while you’re singing; how the pitch moves up and down. ‘Isn’t that obvious?’, you may say. But you’ll be surprised to realise that you hear a few details that you previously didn’t when you bring more attention to your own singing. This obvious skill we have, ‘listening’, tend to get pushed aside even more when it comes to playing an instrument because your mind is so busy with getting your finger work right. It’s the very reason why it’s important to train your ear to know ‘what to listen for’.

For those who just started reading the notations, try not to use your instrument to work out what the tune is. Try to figure it out by singing! Being able to creating an aural map in your mind and to be able to sing it before transferring that to your fingers to execute what’s written on the score is probably the most useful skill to develop if you’re serious about getting better at sight-reading. When you develop this skill, you’ll find that you start mixing with some guessing work to get the music going without any break, which is essentially what the sight-reading is all about; being able to play it through with some sense of musical directions with less mistakes as possible!

Once you trained your eye to differentiate between line notes and space notes (see my previous post about how to learn to sight-read), the next stage is to deepen the understanding how a series of notes on the stave correspond to the movement of them on the instrument you play. But before you start playing them on your chosen instrument, there’re a few more things to do away from your instrument. It’s to recognise whether the next note is going higher or lower than the one before, then how much higher or lower? Before going into the detail of interval (distance between two notes), I usually start with a simple writing game with my young learners. You don’t need to have knowledge of intervals at this point. I simply ask them to write:

1. A line note anywhere you like on the stave
What can you see-writing drill-1
2. Another line note a little bit higher than that
What can you see-writing drill-2
3. Another line note higher than that (that’s where you start using your imagination as you go outside the 5-line stave zone!)
What can you see-writing drill-3
4. A space note higher than that.
What can you see-writing drill-4
5. Another space note a tiny bit lower than that
What can you see-writing drill-5
6. A line note massively lower than that!
What can you see-writing drill-6
7. A space note a tiny bit lower than that without going away from the stave.
What can you see-writing drill-7
8. A line note a lot lower than that.
What can you see-writing drill-8
9. A space note higher than that but still away from the stave.
What can you see-writing drill-9-1
10. Now join all the notes to see what sort of shape appears!
What can you see-writing drill-9
Often, I ask little ones to come up with a title for the shape that appears. The best one I had so far was ‘The Bottom of the Sea’! This game is a first step for the learners to look for shapes in written notations in the music. So, it’s not a pointless exercise at all in my view. It also encourages them to use their imagination they don’t often get to use in learning the rudiments of music.

This writing game encourages the learners to apply what they already know from the previous line/space note recognition game I introduced in PART I where they saw notes with ledger lines to go higher/lower pass the 5-line stave area. No explanation is required because they’re already aware what the ledger line does in practice!

Along side this writing exercise, I also introduce the concept of going up a step or down and a skip up or down on the piano, like a staircase. Then, transfer that onto a paper to show what it looks like on the stave. It looks something like this:

Musical Staircase-steps

Tracing over the staircase under the notes can usually guide learners to grasp how notes are going up on the stave related to how they’re going up on the keyboard. Using the knowledge they already have, I ask them to colour only line (or space) notes. Colouring reveals a pattern of stepwise/skipwise motion on the stave:

Musical Staircase-steps coloured

Stepwise motion is always alternating between line and space note
Skipwise motion is either space notes only or line notes only

N.B. Free download worksheets are available.

You can apply that on the keyboard (white keys only to start with) and do a few games related to step/skip to reinforce the understanding of the concept of these two intervals. ‘Doing’ always seems more meaningful than verbal explanation, and most of all, you can save time!

Obviously, these types of exercises and games I mentioned above are overlapping with introducing how to learn to read notation. At the time of working on these concepts, my students don’t have music to learn from notation just yet but they have a plenty of tunes to play by rote or ear. That’s another thing, without being comfortable with an instrument of your choice to play a few tunes well, you’ll probably struggle to get better at sight-reading as well. So, it’s important that your playing skill is there before start working on sight-reading!

In the meantime, why not try to see if you can train your eye to ‘catch’ quickly stepwise/skipwise motions in the printed music. And play them on your instrument to work out how that feels under your fingers?

In PART III, I’d like to explore more about pattern recognition (visual) in relation to executing them on the instrument (kinaesthetic). Though, another invaluable skill not to be forgotten to develop is being able to ‘hear’ in your mind what you see (aural). This skill only comes in time when you learned and played enough repertoire and you have a wide range of melodic and harmonic shapes in your aural vocabulary so that some ‘guessing work’ comes into play. This is a topic I can talk about in another time in length.